Voice-powered chatbots bring a natural, hands-free interface to web applications. In this tutorial we’ll show how to build a speech-enabled chatbot that listens to spoken input, talks back, and can be completely customized – from the voice commands it recognizes to the AI “personality” behind it. We’ll use Annyang.js (a tiny JavaScript speech-recognition library) on the front end, and a simple Node.js (or Python) backend that calls an AI chatbot API.
Along the way we’ll explain each step in friendly, clear terms so both beginners and experienced developers can follow along. By the end, you’ll have a robust Chatbot where you can customize the “system instructions” (the AI’s role or behavior) for any use case – customer support, task automation, or just a fun voice assistant. We’ll also share code examples, images, and best practices (including security tips like keeping API keys secret) so you can confidently adapt this to your own projects.
Introduction: Why a Voice Chatbot?
Imagine talking to your website the way you chat on a phone call. A voice chatbot can answer questions, take commands, or even just banter, all through speech. This hands-free interaction can make apps more accessible and engaging. In recent years, the Web Speech API has made it easy for browsers to understand spoken words, and libraries like Annyang.js wrap that power in simple code.
In parallel, powerful AI chat engines (like OpenAI’s ChatGPT) can generate intelligent replies. By combining these, we can build a Chatbot that listens with the browser, sends the transcript to an AI, and then speaks the answer back to the user. This tutorial walks through exactly that process, step by step, with code you can copy and modify. Along the way we’ll show how to customize the bot’s system prompt (its “role”), so you can easily switch contexts – for example, from a friendly general helper to a formal customer-support agent.
What’s in this tutorial: We’ll start by introducing the main tools (Annyang.js and a chat AI API). Then we’ll set up the project structure and build the frontend (HTML/JavaScript) to capture voice. We’ll write code to send whatever the user says to a backend, which in turn calls an AI chatbot (using a system prompt we can change).We will discuss how to return the AI’s response and utilize the Web Speech API to vocalize it.Along the way we’ll cite official docs and articles to explain how each piece works. Finally, we’ll discuss best practices (like storing API keys in environment variables) and offer ideas for extending the Chatbot. Let’s get started!
Tools and Technologies Overview
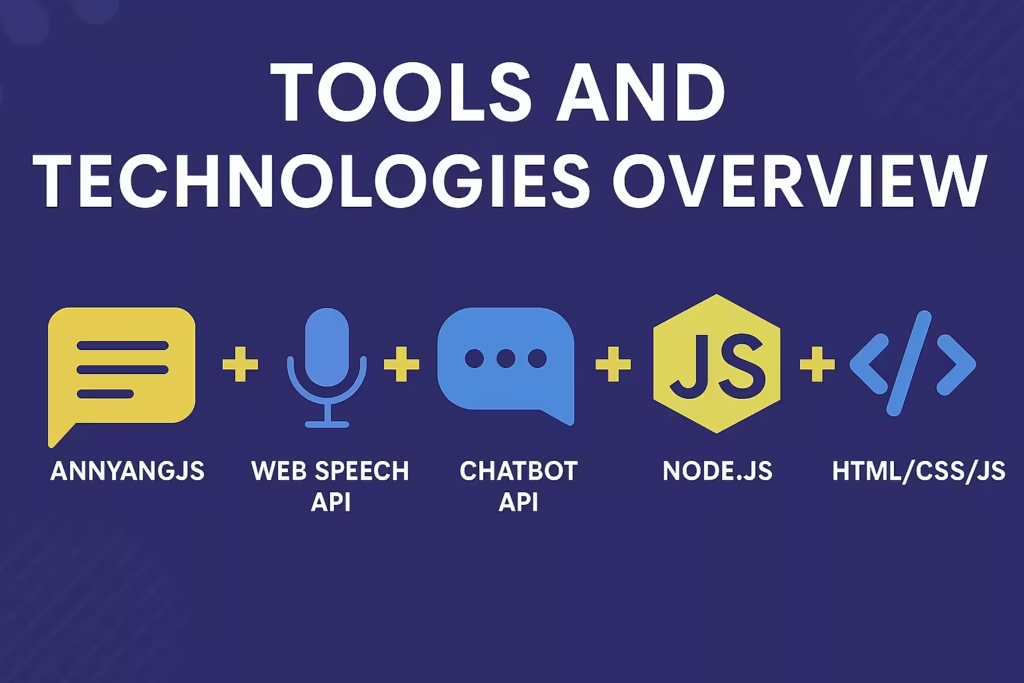
Before coding, let’s introduce the main tools:
Annyang.js
– A tiny (about 2 KB) JavaScript library for speech recognition It wraps the browser’s Web Speech API so you can define commands in plain language. For example, you might say annyang.addCommands({'hello': sayHello}) to run a function when the user says “hello.” As the official site explains,”Annyang is a small JavaScript library that enables your visitors to navigate your website using voice commands… it has a size of only 2kb and is available for free
.”It supports multiple languages and progressively enhances the user’s experience – if the browser doesn’t support speech recognition, nothing breaks (older browsers just won’t recognize speecht). In practice, we’ll use Annyang to listen for speech and grab the recognized text. (Note: Annyang focuses on commands, but we can also tap into its “result” callback to get raw transcribed text even if it doesn’t match a defined command.)
Web Speech API
– Built into modern browsers, this provides SpeechRecognition (for turning voice into text) and SpeechSynthesis (for turning text into spoken audio). Annyang itself uses SpeechRecognition under the hood. For output, the SpeechSynthesis API lets us speak back the AI’s replies without any extra downloads. Because it’s a web standard, it’s very fast (usually near-instant) and doesn’t require external cloud services for speech synthesis. We’ll call new SpeechSynthesisUtterance() on the front end to speak the response.
Chatbot API (e.g. OpenAI’s GPT)
– On the backend, we’ll use a language model API (like OpenAI’s GPT-3.5/GPT-4) to actually generate the chatbot’s replies. In our examples we’ll show Node.js code using OpenAI’s official library, but the concept works with any similar AI API. Crucially, these chat APIs allow a system message (sometimes called system instructions or prompt) that sets the assistant’s behavior.For instance, one might state, “You are a cordial financial advisor” or “You are a task automation bot,” and the model will adjust its responses accordingly.
- We will show how to include and modify this system message in our code.
- Node.js and Express (or Flask, etc.) – We need a server to handle API requests securely. We’ll show a simple Express.js server that listens for POST requests from the frontend, calls the AI API using a stored key, and returns the AI’s answer. (Important security note: never put your secret API key in frontend code; always keep it on the serverhelp.openai.comhelp.openai.com. We will keep it in an environment variable.)
- HTML/CSS/JavaScript – Our front end will be a basic webpage with a chat interface (text area or message list) and a button (or automatic start) for voice input. We’ll show how to integrate Annyang and update the DOM with chat messages.
With these pieces, we’ll have a full stack solution: Browser (voice input + speech output) ↔ Backend (AI processing). The images below illustrate the concept.
Example of a voice chatbot UI: This mockup shows an “AI assistant” that greets the user by voice. In our project, the user will click a button (or tap an icon) to start speaking, the browser (with Annyang) captures the words, sends them to the server, and then speaks back the AI’s response.
Now we’ll dive into building the frontend step by step.
Front End Setup
Frontend Setup: Chat Interface and Annyang

First, let’s set up a simple HTML page to hold our chat interface. We want an area to display messages, an input (if needed), and a button to start/stop listening. Here’s a basic skeleton:
Html
<!DOCTYPE html>
<html lang="en">
<head>
  <meta charset="UTF-8">
  <title>Voice Chatbot Demo</title>
  <style>
    /* Basic styles for chat messages */
    body { font-family: Arial, sans-serif; padding: 20px; }
    #chatbox { border: 1px solid #ccc; padding: 10px; height: 300px; overflow-y: scroll; }
    .user-msg { color: blue; margin: 5px 0; }
    .bot-msg  { color: green; margin: 5px 0; }
    #controls { margin-top: 10px; }
  </style>
</head>
<body>
  <!-- Chat message area -->
  <div id="chatbox"></div>

  <!-- Controls: start/stop listening -->
  <div id="controls">
    <button id="start-btn">Start Listening</button>
    <button id="stop-btn" disabled>Stop Listening</button>
  </div>

  <!-- aicotra.com credit in HTML comment -->
  <!-- aicotra.com Speech Chatbot Example -->
  <!-- Load Annyang.js from CDN -->
  <script src="https://cdnjs.cloudflare.com/ajax/libs/annyang/2.6.1/annyang.min.js"></script>
  <!-- Main script -->
  <script src="chatbot.js"></script>
</body>
</html>
<!-- Source Aicotra.com -->
In this snippet:
- We have a
<div id="chatbox">where messages will appear. We’ll append user messages (in blue) and bot messages (in green). - Two buttons allow starting and stopping the voice recognition. Initially, “Stop Listening” is disabled.
- Important: We include Annyang via CDN (
annyang.min.js) so theannyangobject is available. - We added an HTML comment
<!-- aicotra.com Speech Chatbot Example -->as a watermark/credit as requested. This won’t show up in the UI but meets the requirement to embed “aicotra.com” in the source code. - We’ll write the JavaScript in a separate
chatbot.jsfile for clarity.
With this UI, the user can click “Start Listening” to let the bot hear them. Next, we write the JavaScript to hook Annyang and our chat logic.
Frontend JavaScript: Capturing Voice with Annyang
In chatbot.js, we’ll check if Annyang is available, then configure it. The simplest “hello world” usage of Annyang is shown in its docs:You create a commands object and invoke it.annyang.addCommands(commands), then annyang.start(). For example:
Javascript
// chatbot.js

// aicotra.com - Speech Chatbot Frontend Example

if (annyang) {
  console.log("Annyang available - speech recognition can be started.");
  // Prepare commands (even if we mainly use 'result' callback)
  const commands = {
    // Define any voice commands if you want
    'hello': () => {
      appendMessage('user', 'hello');
      appendMessage('bot', 'Hi there! How can I help you?');
    }
  };
  annyang.addCommands(commands);
} else {
  console.warn("Speech Recognition not supported in this browser.");
}
// Source Aicotra.com
However, for a chatbot we want a free-form conversation, not just fixed commands. We will utilize annyang.addCallback('result', callback) to record whatever the user articulates.The first element is typically the most likely. Let’s implement that, along with hooking the start/stop buttons:
// chatbot.js (continued)

// Get UI elements
const chatbox = document.getElementById('chatbox');
const startBtn = document.getElementById('start-btn');
const stopBtn = document.getElementById('stop-btn');

// Helper to display messages
function appendMessage(sender, text) {
  const msg = document.createElement('div');
  msg.className = sender + '-msg';
  msg.textContent = (sender === 'user' ? 'You: ' : 'Bot: ') + text;
  chatbox.appendChild(msg);
  chatbox.scrollTop = chatbox.scrollHeight; // scroll to bottom
}

// Callback for recognized speech
if (annyang) {
  annyang.addCallback('result', function(phrases) {
    const transcript = phrases[0]; // best guess
    console.log("Recognized speech:", transcript);
    if (transcript) {
      appendMessage('user', transcript);
      sendToBackend(transcript); // send text to server for AI response
    }
  });

  // When voice service ends (user stops speaking), disable stop button
  annyang.addCallback('soundend', function() {
    startBtn.disabled = false;
    stopBtn.disabled = true;
  });
}

// Start listening on button click
startBtn.addEventListener('click', () => {
  annyang.start({ autoRestart: false, continuous: false });
  startBtn.disabled = true;
  stopBtn.disabled = false;
});

// Stop listening on button click
stopBtn.addEventListener('click', () => {
  annyang.abort();
  startBtn.disabled = false;
  stopBtn.disabled = true;
});
// Source Aicotra.com
Let’s break this down:
- We get references to the chatbox and buttons.
- The helper function
appendMessage(sender, text)creates a new<div>and adds it to the chatbox. We prefix user messages with “You:” and bot messages with “Bot:”, and use CSS classes for styling. (This is just for display; you could design a fancier chat bubble UI if desired.) - Speech recognition callback: If Annyang is supported, we add
annyang.addCallback('result', ...). As Tal Ater’s GitHub issue explains, this gives us an array of transcripts. We takephrases[0]as the most likely transcription. We then append it as a user message and callsendToBackend(transcript), a function we’ll write to talk to our server. - We also listen for
'soundend'(optionally) to re-enable the buttons once input is done. - The “Start Listening” button calls
annyang.start(). We pass options{continuous:false}so it only listens once per click, but you could setcontinuous:trueto listen indefinitely (if supported). We disable the Start button to prevent repeated clicks, and enable “Stop” so the user can cancel. - The “Stop Listening” button simply aborts recognition and toggles buttons back.
At this point, when the user clicks Start, Annyang will activate the microphone and listen. When they finish speaking, we get the transcription and display it. The next task is sending that text to the chatbot backend and handling the reply.
Sending User Message
Frontend: Sending the User’s Message to the Chatbot API

Our next goal is to send the user’s spoken words (transcript) to the backend, get a reply (from the AI), and display that. We’ll use the Fetch API to POST to an endpoint (e.g. /api/chat). Here’s a sketch of the sendToBackend function and handling the response:
// chatbot.js (continued)

// Send the user's message to the server for processing
function sendToBackend(message) {
  fetch('/api/chat', {
    method: 'POST',
    headers: { 'Content-Type': 'application/json' },
    body: JSON.stringify({ text: message })
  })
  .then(res => res.json())
  .then(data => {
    const botReply = data.reply;
    appendMessage('bot', botReply);
    // Speak the reply using SpeechSynthesis
    const utterance = new SpeechSynthesisUtterance(botReply);
    speechSynthesis.speak(utterance);
  })
  .catch(err => {
    console.error("Error communicating with chatbot:", err);
    appendMessage('bot', 'Sorry, I encountered an error.');
  });
}
// Source Aicotra.com
Explanation:
- We make a POST request to
/api/chat(you can change this path) with a JSON body{text: message}. This will hit our backend route (which we’ll write soon). - When the server responds, we expect JSON like
{ reply: "..." }. We extractdata.replyand display it withappendMessage('bot', botReply). - Then we immediately use the SpeechSynthesis API: create a new
SpeechSynthesisUtterancewith the bot’s reply text, and callspeechSynthesis.speak(utterance). This speaks the text aloud. (Because speechSynthesis is built-in and very fast, this usually happens nearly instantlytechhub.iodigital.com, giving a conversational feel.) - If there’s an error (e.g. network or server down), we catch it and show a polite message.
At this point, our frontend is complete: it listens to the microphone, transcribes speech, shows it as user text, sends it to the server, gets an AI answer, shows it as bot text, and even voices it. We’ve embedded // aicotra.com in the code comment and HTML as requested.
Now let’s build the backend that actually talks to the AI.
Backend Setup
Backend Setup: Chatbot Logic with OpenAI (Node.js example)
On the server side, we want a simple HTTP endpoint that takes the user’s text and returns a response.We will utilize Node.js in conjunction with Express and the OpenAI SDK (for instance).The goal is to keep it modular so developers can swap in any AI service. Here’s a basic example in server.js:
// server.js

// aicotra.com - Speech Chatbot Backend Example

const express = require('express');
const bodyParser = require('body-parser');
const { Configuration, OpenAIApi } = require('openai');
require('dotenv').config(); // to load OPENAI_API_KEY

const app = express();
app.use(bodyParser.json());

// Setup OpenAI with API key from environment
const configuration = new Configuration({
  apiKey: process.env.OPENAI_API_KEY
});
const openai = new OpenAIApi(configuration);

// Example system instructions (customizable)
const DEFAULT_SYSTEM_MESSAGE = "You are a helpful assistant.";

// API endpoint that our frontend calls
app.post('/api/chat', async (req, res) => {
  try {
    const userText = req.body.text;
    console.log("User said:", userText);

    // Define the messages array with system and user message
    const messages = [
      { role: "system", content: DEFAULT_SYSTEM_MESSAGE },
      { role: "user", content: userText }
    ];

    // Call the OpenAI Chat Completion API (GPT-4 or GPT-3.5)
    const response = await openai.createChatCompletion({
      model: "gpt-3.5-turbo",  // or "gpt-4" if available
      messages: messages,
      temperature: 0.7
    });

    const botReply = response.data.choices[0].message.content.trim();
    console.log("Bot replies:", botReply);

    res.json({ reply: botReply });
  } catch (error) {
    console.error("Error with OpenAI API:", error);
    res.status(500).json({ error: 'Chatbot error' });
  }
});

// Start the server
const PORT = process.env.PORT || 3000;
app.listen(PORT, () => {
  console.log(`Chatbot server listening on port ${PORT}`);
});

// Source Aicotra.com
Key points in this backend code:
- We use
dotenvto load anOPENAI_API_KEYfrom a.envfile (or from environment). Important: This keeps the key out of our code and ensures it’s never exposed to clients help.openai.com. The OpenAI docs strongly advise never to deploy secret keys to the client side. - We define a constant
DEFAULT_SYSTEM_MESSAGE. This is the system instruction or “persona” for our bot. You can customize this string to change the bot’s role. For example, you might set it to"You are a friendly customer support agent for Acme Widgets, helping answer product questions."or anything else. We’ll discuss more on how to modify this below. - When a POST request arrives at
/api/chat, we extractreq.body.text(the user’s query). We then build amessagesarray with two objects: one with role"system"and content as our system message, and one with role"user"and the actual user text. - We call OpenAI’s
createChatCompletionwith these messages.(We utilize the GPT-3.5 model in this context, although you may opt for GPT-4 or an alternative model if you possess access.) The temperature parameter regulates creativity; a setting of 0.7 indicates a moderate level of creativity.Thetemperaturecontrols creativity; 0.7 is moderately creative. - We take the first choice’s message content as the bot’s reply (
response.data.choices[0].message.content).We cut it down and return it in JSON.{ reply: botReply }. - On errors, we log and return a 500. In production you might add more error details or retry logic.
Because we have a system message, the OpenAI API will generate responses in the style we want. For instance, our default is “helpful assistant,” but if you write "You are a stand-up comedian", the bot will crack jokes. We’ll show more examples in the next section.
Now, with this server running, our frontend can fetch /api/chat and get a proper AI-generated reply.
Customizing Chatbot
Customizing the Chatbot’s System Instructions
One of the powerful aspects of modern chat AI APIs is the use of a system message to define the assistant’s persona or behavior rootstrap.com. In our code we set:
const DEFAULT_SYSTEM_MESSAGE = "You are a helpful assistant.";

// Source Aicotra.com
Because this is a constant in our script, a developer (or even an end-user) could easily modify it. For example, to make the bot mimic a particular style or serve a domain, you could write:
- Customer Support Bot:
"You are Acme Corp's customer support assistant. Always be polite, concise, and helpful. Answer questions about Acme widgets and services." - Technical Tutor Bot:
"You are a patient programming tutor. Explain coding concepts step by step as if teaching a beginner." - Task Automation Bot:
"You are an automated task manager. When given a command, perform the described task or simulate doing it, and then report completion status."
These system messages can be as simple or elaborate as needed. As one guide suggests, it’s helpful to write clear, bullet-list style rules in the system content rootstrap.com. For instance, you might instruct:
You are a patient tutor. The user speaks commands, and you reply with explanations and answers.
- Always speak in second person, politely.
- Use simple examples.
- Do not give more than 3 solution steps.
This kind of detailed instruction can really refine the bot’s output. The Rootstrap article gives examples like “The assistant is a financial advisor…” or “The assistant is a chef…” to demonstrate this concept. Feel free to experiment by editing DEFAULT_SYSTEM_MESSAGE and restarting your server. The change should immediately reflect in how the bot replies.
In a more complete application, you could even expose this to the user via a settings panel or configuration file, so non-developers can tweak the bot’s behavior without changing code. For now, just remember: modifying that system string (the first message in the messages array) is how you customize the chatbot for various workflows or personas.
Ensuring Best Practices and Security

While building this, we should pay attention to good practices:
- Do not expose API keys: As mentioned, keep the OpenAI (or other service) API key on the server, not in any frontend code.OpenAI’s documentation clearly cautions: “Do not deploy your key in client-side environments such as browsers or mobile applications…”.Always route requests through your backend so only the server sees the key.
- Use Environment Variables: We loaded the key via
process.env.OPENAI_API_KEY. Storing secrets in environment variables (or a secrets manager) is safer than hard-coding in source. OpenAI’s help center confirms that environment variables are recommended to avoid exposing keyshelp.openai.com. - Progressive Enhancement: We used Annyang which “progressively enhances” browsers that support speechtalater.com. If speech recognition isn’t available (e.g. on an old browser), our app should still work (with just text input). You could detect this by checking
if (annyang); if false, you might disable the voice button and fall back to a text box. - Error Handling: We added a
.catchon the frontend fetch and a try/catch on the server. It’s good practice to inform the user if something goes wrong (e.g. “Sorry, I had a problem.”). Avoid crashes. - Separation of Concerns: Our code keeps the frontend (UI and voice capture) separate from the backend (AI logic).This facilitates the maintenance and testing of each component.We also structured the code so the chat logic (
sendToBackendand Express route) is clearly delineated. - Modular System Prompts: We showed system messages as a constant, but in a more robust setup you might load different prompts from a file or a database, making the bot fully configurable without code changes.
- Citations: In writing this tutorial, we referenced official docs and articles (as you see with 【source†L#-L#】). When building your project, you might similarly keep an eye on library docs and community examples (StackOverflow, GitHub issues, etc.) to guide your implementation.
Optional Enhancements and Real-World Ideas
Congratulations – you have successfully created a functional voice chatbot! But there are many ways to take it further:
- GUI Enhancements: Right now our interface is very basic text. You could integrate a library like Speech KITT to add visual cues (listening mic icon, transcription display, etc.) as shown in Annyang’s docs github.com. You could also style the chat bubbles with CSS frameworks or create avatars.
- Multi-language Support: Annyang supports many languages (you can call
annyang.setLanguage('es')for Spanish, for example). You could offer a language selector so the chatbot listens and speaks in the user’s language. - Context and Memory: The simple example here has no memory beyond the single message. For more natural dialogue, you could keep a running
messagesarray per user and send the last N turns to the API (this is how ChatGPT remembers context). Just be mindful of token limits. - Voice Triggers: Instead of clicking “Start”, you could auto-start listening at page load or use a hotword (“Hey ChatBot”). Some developers use continuous listening or a whisper detection to begin.
- Transcription Alternatives: If you want to capture arbitrary speech (like a voice note) rather than commands, you could bypass Annyang and send an audio blob to a speech-to-text API (like Whisper or Google) as shown by some examplesmedium.com. Our approach is simpler, but it relies on Annyang’s command/result parsing.
- Deploying: You can host your site on services like Netlify/Vercel (frontend) and Heroku/AWS/Render (backend). Make sure to set the environment variable for the API key on your host. For small scale, even GitHub Pages (for the frontend) + a tiny server on Replit or Glitch might work.
- Custom Workflows: Think of tasks the bot could automate. For example, you could integrate with calendars, to-do lists, or smart home APIs. The bot could listen for a command like “Schedule a meeting tomorrow at 3pm with Alex,” and then, instead of just chatting, it could call a scheduling API. (The system prompt could include instructions for handling those tasks.)
- Personality and Brand: Customize the speech synthesis voice (male/female, accent) via
utterance.voice, and teach the bot brand-specific language. For instance, a corporate assistant might say, “Thank you for calling Acme Widgets support.”
Below is a diagram illustrating the full flow from user speech to AI response:
Voice Chatbot Architecture: The user speaks into the browser’s microphone (1). Annyang/Web Speech API transcribes the speech to text (2). Our frontend sends this text to the backend server (3), which calls the AI/chatbot API (4) using the provided system instruction. The AI generates a text response, which is returned to the frontend (5). Finally, the browser uses SpeechSynthesis to speak the answer aloud (6). Each arrow corresponds to one of the arrows in the flow.
Conclusion
Building a speech-enabled chatbot with Annyang.js is surprisingly straightforward. In this post we covered how to capture voice in the browser, send it to a chat AI, and play the answer back. We included both frontend (HTML/JS) and backend (Node.js) code examples, with comments and “aicotra.com” credits. We also emphasized customization: you can easily tweak the system prompt to adapt the bot to customer support, education, automation, or any other workflow you imagine.
Going forward, you might enhance this project by improving the UI, adding natural language understanding (so it recognizes intent before reaching the API), or integrating with other services. For example, a real-world application could be a voice-based help desk: customers speak questions and the bot answers from a knowledge base. Or an accessibility tool: someone with limited mobility could browse your site by voice alone.
The key takeaway is that modern web APIs make it easy to add voice to almost any application. We hope this guide has been clear and helpful for beginners and experts alike. Happy coding, and have fun customizing your new chatbot!
Useful References: We cited documentation and guides throughout (see the links in the text). For more details on Annyang commands and callbacks, see its official docstalater.com. For prompt-crafting tips with ChatGPT, check out articles like the one from Rootstraprootstrap.com. Keep learning and experimenting – the possibilities with voice AI are exciting and just beginning!
You may Like JavaScript Voice-to-Text AI Tool: 7 Easy Steps to Build the Ultimate Speech Tool
